John Rankin @ August 17, 2018
Docker is my next main task. Docker is container that holds your application, and your application depedancies. I want to think of this as a mini-virtual machine image that sits on top of your OS. When your Docker container is executed it boots into it's own environment, where everything it does inside of the container, is well infact self-contained. This means if it writes inside of the container, it stays inside the container.
It seems complicated, but it's not. And for my test-cases I can add input arguments into docker run to help access resources of the OS. You will see my logic as we test out running a docker container.
Assumptions: You already have docker installed.
For this example we are going to start a basic nginx webserver docker container. We
To run a docker container:
root@damrkul2:~/aws# docker run -d nginx
fa0b8de8deab3f23a0a4637a861e0b916e942211746ecd6ca2e79a6528860cc8
That's it. Docker will download the latest nginx Docker container, and start it. We used the "-d" to detatch the container, to get our prompt back. Lets take a look to see if its running.
root@damrkul2:~/aws# docker ps
CONTAINER ID        IMAGE               COMMAND                  CREATED              STATUS              PORTS               NAMES
fa0b8de8deab        nginx               "nginx -g 'daemon of…"   About a minute ago   Up About a minute   80/tcp              gifted_ride
You can see that:
- a container is currently being run;
- the command that is being executed in the container:
- What port the container is being listened to
Now unfortunately, the workstation I am currently using already has PORT 80 taken by apache. So going to http://www.rekous.com:80 simply doesn't work.
Well FORTUNATELY , docker allows you to re-map ports that the container listens on and redirects them to a port of your choosing.
Lets Map the Container's PORT 80 , and re-map it to a custom defined port. Let's use 8080. To do that, we need to add an additional argument:
-p {NEW_PORT}:{containerPORT}
So lets's see what happens when we run it with the additional parameter.
root@damrkul2:~/aws# docker run -p 8080:80 -d nginx
0ffcfeb8bba82235da5264b298844fbe4c6c60b5a24158c1d77cc6bcd48f6b29
root@damrkul2:~/aws# docker ps
CONTAINER ID IMAGE COMMAND CREATED STATUS PORTS NAMES
0ffcfeb8bba8 nginx "nginx -g 'daemon of…" 3 seconds ago Up 2 seconds 0.0.0.0:8080->80/tcp jolly_hodgkin
So we mapped Port 8080 on the OS to PORT 80 on the container. You can see that from running docker ps ... 0.0.0.0:8080->80/tcp
Lets see if it works? I opened up a web browser and went to http://rekous.com:8080
Here are the results:
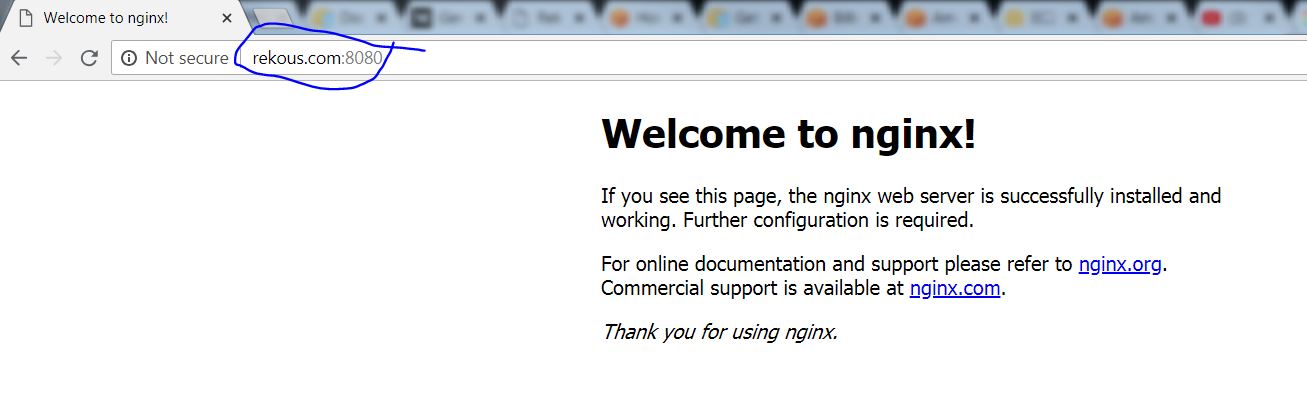
Awesome? Simple? Quick? You betcha.
But what now do I do with it? How can I edit it? Dont sweat it.
Nginx's default path inside of the container is located at: /usr/share/nginx/html ... What we can do now is Mount and bind our OS Web directory to that directory and the container will now be reading those files instead.
We will need to add an additional flag: -v (volume mounting).
-v {Path_on_our_OS}:{Path_inside_container}:{RO|RW}
We will specify our volume container mount read only for this example;
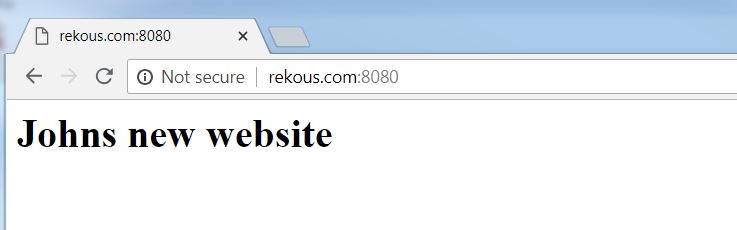
Before we re-start our container with the new parameter... lets make a simple website
root@damrkul2:/var/www# mkdir -p /var/www/dockertest/
root@damrkul2:/var/www# echo '
Johns new website
' >> /var/www/dockertest/index.html
root@damrkul2:/var/www# cd /var/www/;chmod 777 dockertest/ -R
Thats a pretty simple website isn't it?
Let's now restart the container with the new parameter:
root@damrkul2:~/aws# docker run -v /var/www/dockertest:/usr/share/nginx/html:ro -p 8080:80 -d nginx
Let's see if nginx is reading our new location:
Summary
We can run a docker container that is self contained to some extent. But when needed, it is very easy to re-map not only Ports, but can also Bind/mount volumes to the OS . This way the actual running application binary is Self contained. We could easily download other docker images and tryout new Web servers by following the same process.
Another useful point of a docker image is that we do not need to worry about additional dependancies. There is no "apt-get install" or "yum install". You simply download a docker image, and simply execute it. That's it. This is very beneficial because if we tried out nginx, and we didn't like it, we just simply remove the docker image. We are not leaving any traces of all of those additional library dependancies like when do a "apt-get install" or "yum install" . This makes your OS fairly clean.